Setup NFS Drive for Kubernetes
Setting up NFS storage for a local bare-metal kubernetes cluster can be a bit of a pain. Luckily for you, we’ll go step by step on how to successfully set up an NFS share for your cluster for persistent storage, whether it’s on virtual machines or Raspberry Pi’s.
To start it off, I’d recommend a host that’s not part of your cluster. if you want to go the route I took, I purchased a Penta Sata hat for Rock Pi 4 along with the ROCK PI 4 Model A+ - Board only - 4GB/32GB. I’m not going to go in detail on how I flashed the operating system on the eMMC.it was pretty annoying to be honest but there’s documentation available on at https://wiki.radxa.com/Rockpi4
A quick google search shows axzez has a carrier board for the RPi Compute Module 4 at https://www.axzez.com/product-page/interceptor-carrier-board but these boards are still in pre-order at time of writing (03/15/22)
If you’re cluster is VM based, I’d recommend just spinning up a new VM dedicated to your NFS host, with two storage drives. One for your host OS, and one dedicated for the NFS Drive.
Installing OpenMediaVault
We’re going to be using OpenMediaVault for our NFS storage solution. In order to install OpenMediaVault, install the host OS with a minimum Debian net install image: https://www.debian.org/CD/netinst/
once, the host OS has been installed, follow the instructions here: or below(I’d recommend the official documentation, since my page could go out of date and is literally a copy/paste)
Install the openmediavault keyring manually:
apt-get install --yes gnupg
wget -O "/etc/apt/trusted.gpg.d/openmediavault-archive-keyring.asc" https://packages.openmediavault.org/public/archive.key
apt-key add "/etc/apt/trusted.gpg.d/openmediavault-archive-keyring.asc"
Add the package repositories:
cat <<EOF >> /etc/apt/sources.list.d/openmediavault.list
deb https://packages.openmediavault.org/public shaitan main
# deb https://downloads.sourceforge.net/project/openmediavault/packages shaitan main
## Uncomment the following line to add software from the proposed repository.
# deb https://packages.openmediavault.org/public shaitan-proposed main
# deb https://downloads.sourceforge.net/project/openmediavault/packages shaitan-proposed main
## This software is not part of OpenMediaVault, but is offered by third-party
## developers as a service to OpenMediaVault users.
# deb https://packages.openmediavault.org/public shaitan partner
# deb https://downloads.sourceforge.net/project/openmediavault/packages shaitan partner
EOF
Install the openmediavault package:
export LANG=C.UTF-8
export DEBIAN_FRONTEND=noninteractive
export APT_LISTCHANGES_FRONTEND=none
apt-get update
apt-get --yes --auto-remove --show-upgraded \
    --allow-downgrades --allow-change-held-packages \
    --no-install-recommends \
    --option DPkg::Options::="--force-confdef" \
    --option DPkg::Options::="--force-confold" \
    install openmediavault-keyring openmediavault
And then finally run:
omv-confdbadm populate
Setting up NFS in OpenMediaVault
With OMV installed, we can now set up NFS. Open a browser type in your OMV host’s IP into the url bar. Keep in mind if your on a virtualbox VM, you might need to do some networking magic and forward your ports. If you’re unsure what your NFS Server’s IP address is, simply type $ ip a in terminal and copy the output of the interface that is no lo:
192.168.122.81
The default login credentials are as follows:
- Username: Admin
- Password: openmediavault
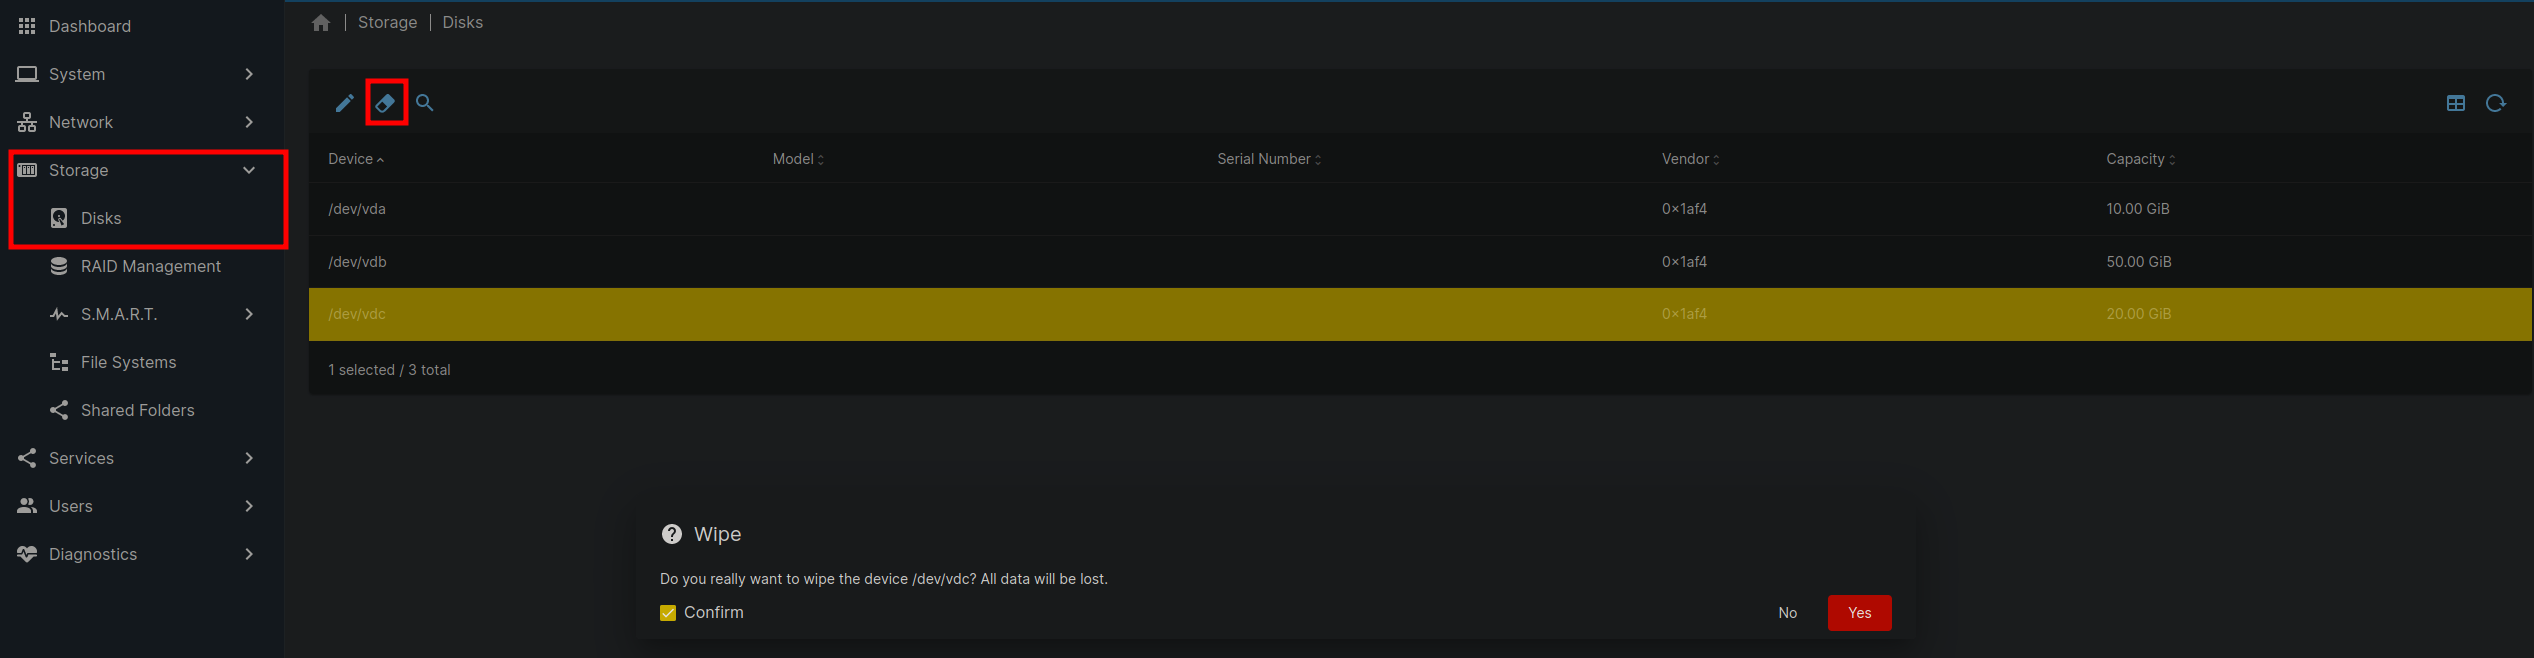
You should probably change the default password, but I’m not going to get into that. Once you’ve signed in, on the left sidebar, click on storage -> Disks and select the secondary drive added, and wipe it.
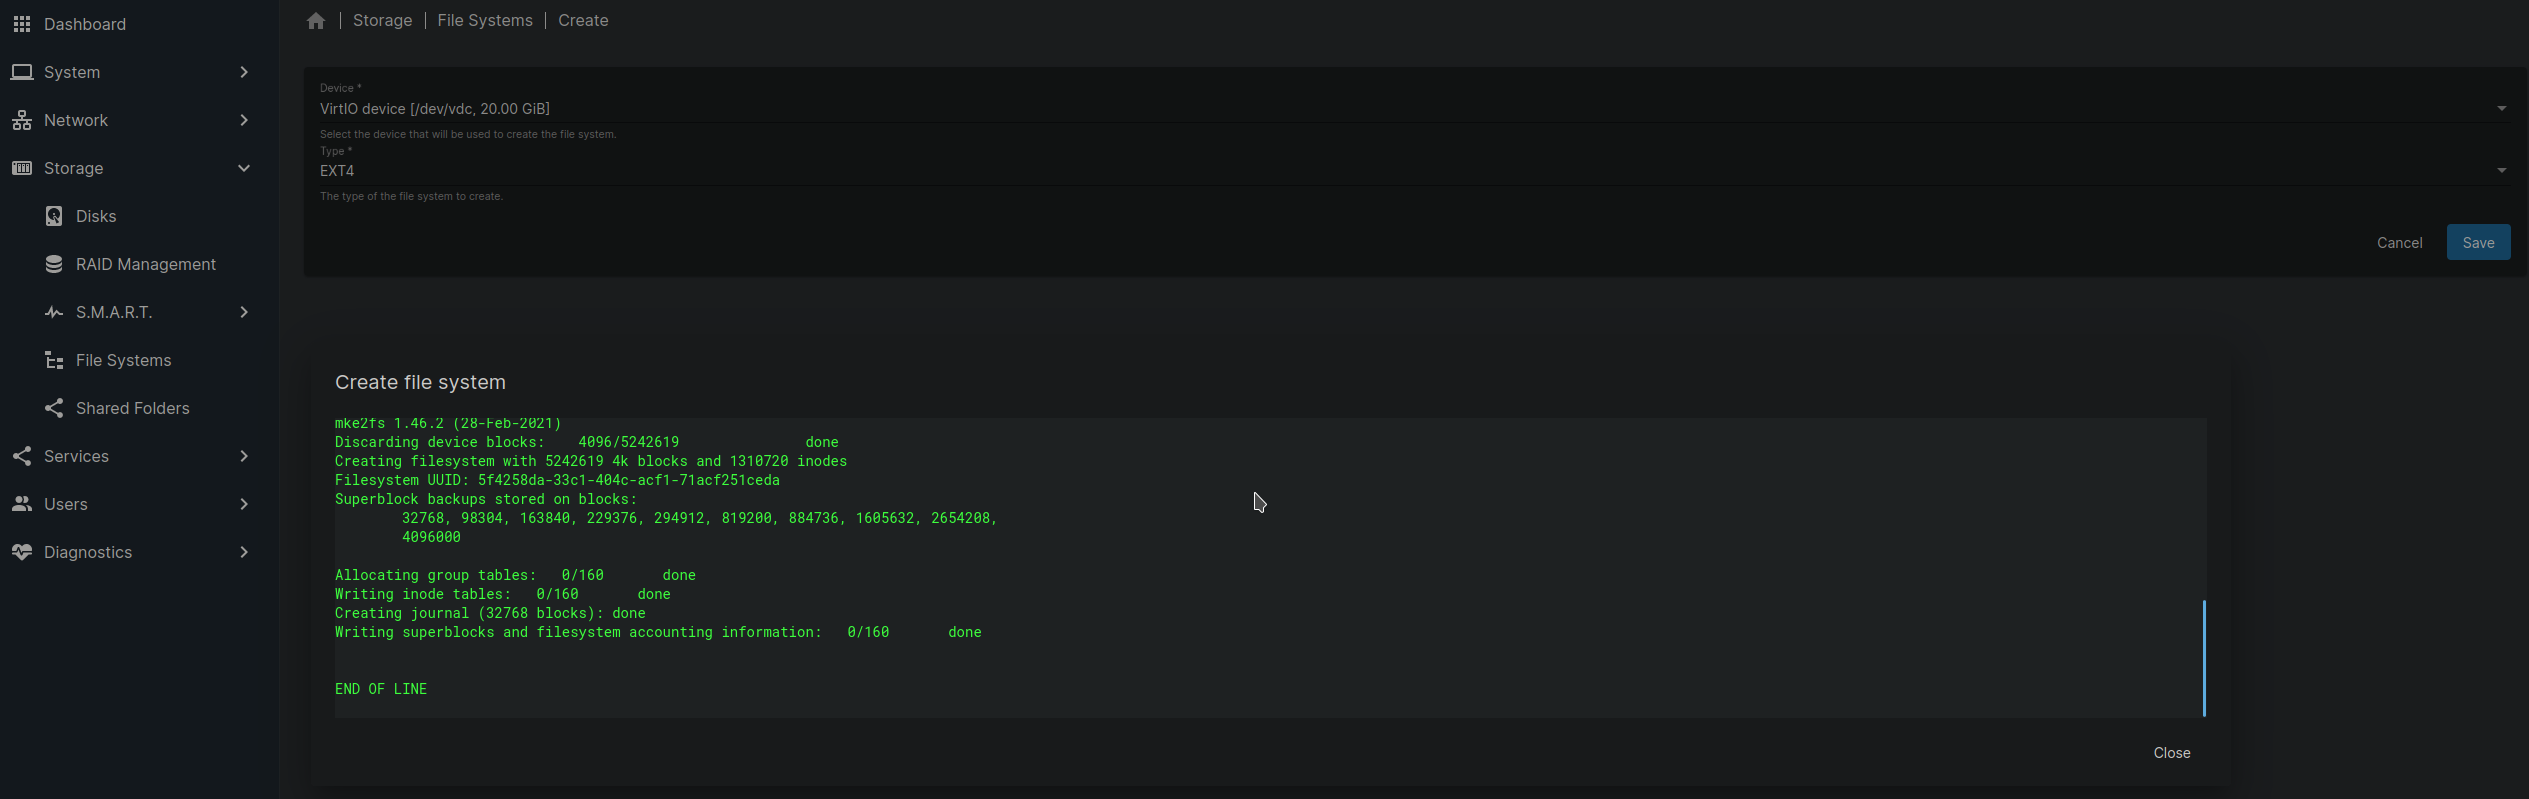
Next, we’ll go into File Systems, click on the “+” Symbol and then click on Create. One the Next Page for Device, you’ll want to select the device we just wiped. The “Type” can stay as EXT4. Then click Save and wait for the file system to be created.
Next Click on the “+” Symbole again, this time we’ll click on Mount. On the Mount Screen, we’ll choose the newly created file system and click save. You should then get a Yellow Banner at the top of the page asking you to apply the changes. Go ahead and click on the “Check Mark” symbol to apply the changes.
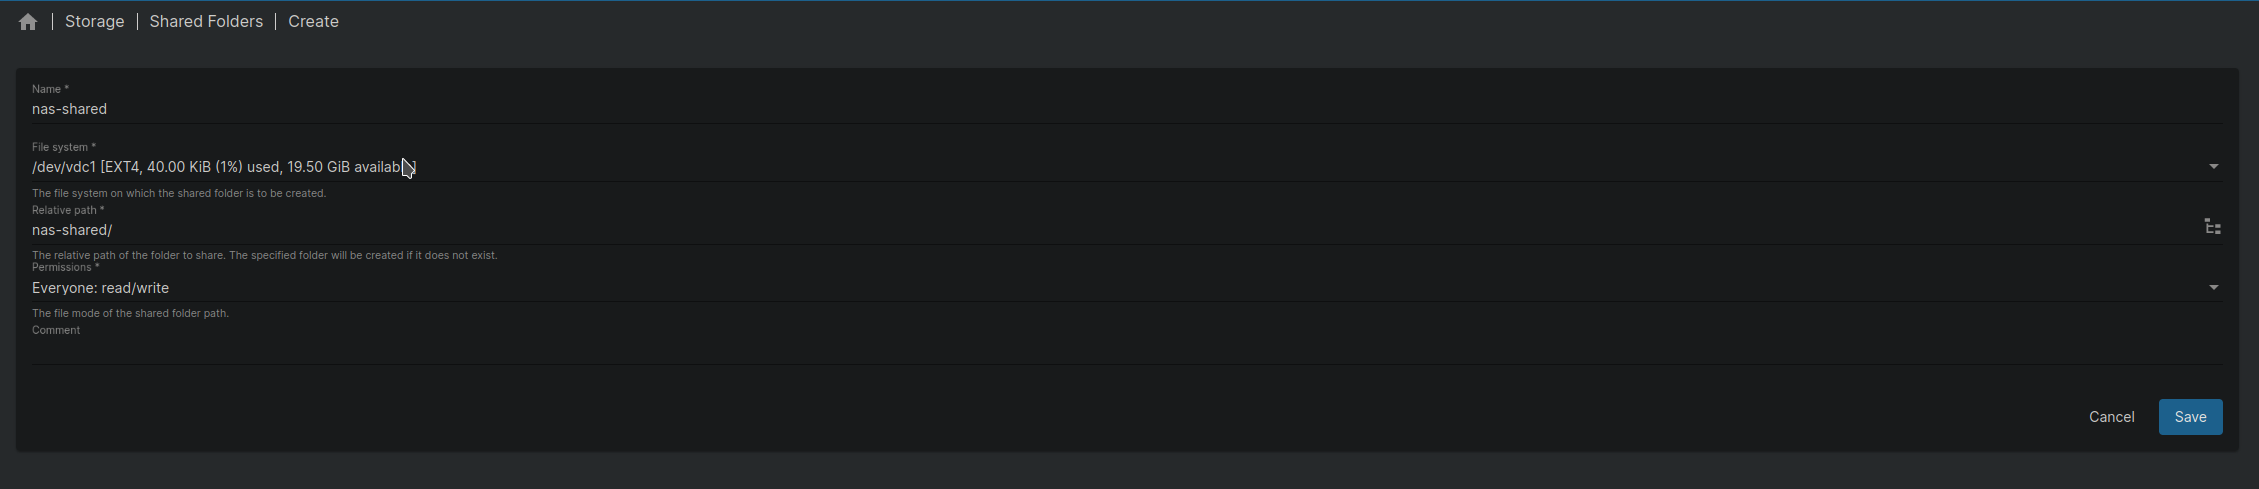
Now we’ll want to create a shared folder. On the left side bar under the storage category, click on Shared folders and then click on the “+” symbol again. Give your shared folder a name(mine is named nas-shared). The relative path should autofill, we’ll keep this as is. For Permissions we’ll choose Everyone: read/write. Once all of this has been done, click on Save. On the next screen, you should see the yellow banner again, click on the check mark symbol one more time to apply our changes
Now we’re ready to enable the NFS Service. To do this, Click on Services on the left sidebar, and then click on NFS. You should see the Settings and Shares button on this screen. First we’ll enable NFS by clicking on Settings and then check the Enabled option, and then hit save.
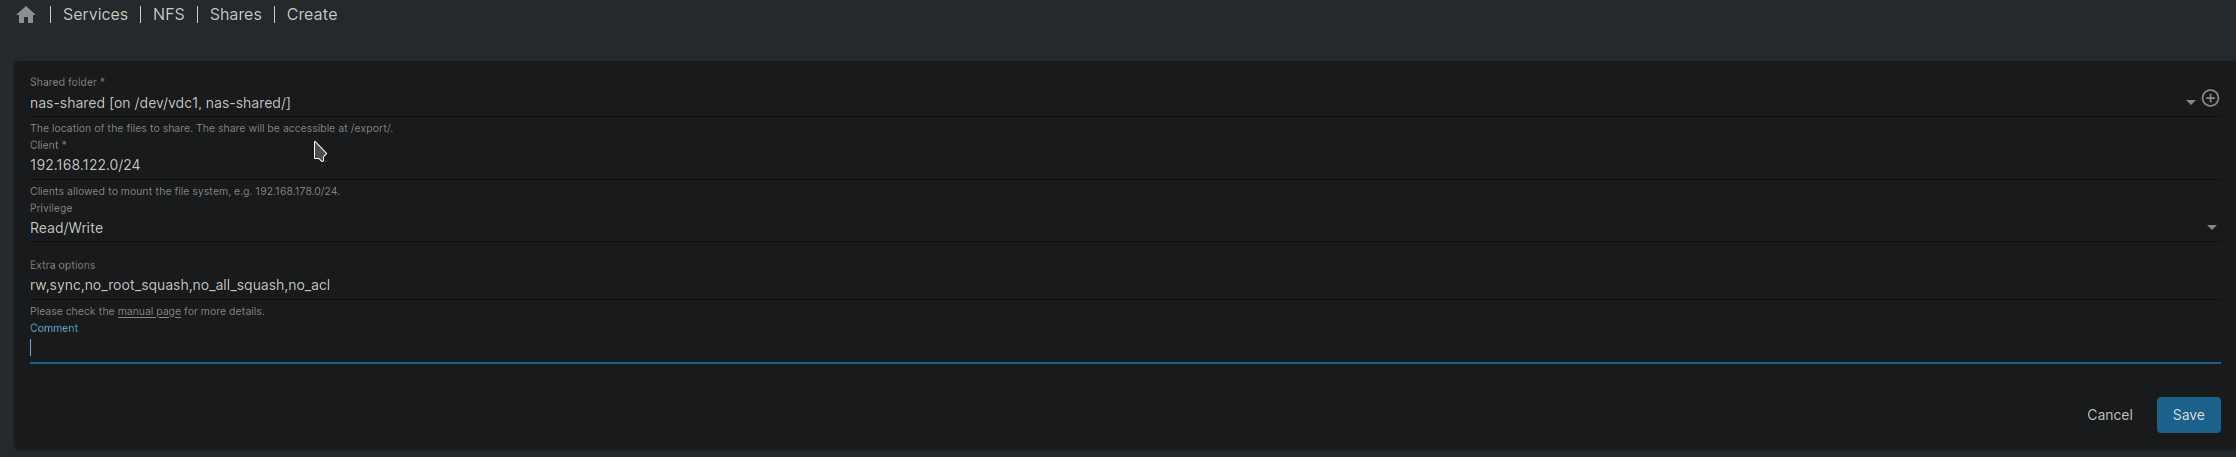
Next, we’ll click on Shares and then click on the “+” symbol to add our shared-folder. On the next screen, we’ll choose our newly created shared-folder, in my case, it was nas-shared.
- For client, I’ve allowed access on the 192.168.122.0/24 subnet(where my kubernetes cluster nodes live).
- Privlege is set to “Read/Write”
- Extra options has the following:
rw,sync,no_root_squash,no_all_squash,no_acl
Click Save, and on the next screen, again the yellow banner will appear. Click on the checkmark to apply the changes
next let’s go into each of our kubernetes cluster’s nodes and edit the /etc/fstab entry to automount our nfs drive
my entry contains the following line at the end of the file:
192.168.122.81:/export/shared-nas/ /mnt/nas_nfs nfs defaults,proto=tcp,port=2049 0 0
If your unsure the location of you shared drive, the default is /export/(name of your Shared Folder). In my case, the name of the shared folder was shared-nas, so the location of my shared drive is /export/shared-nas